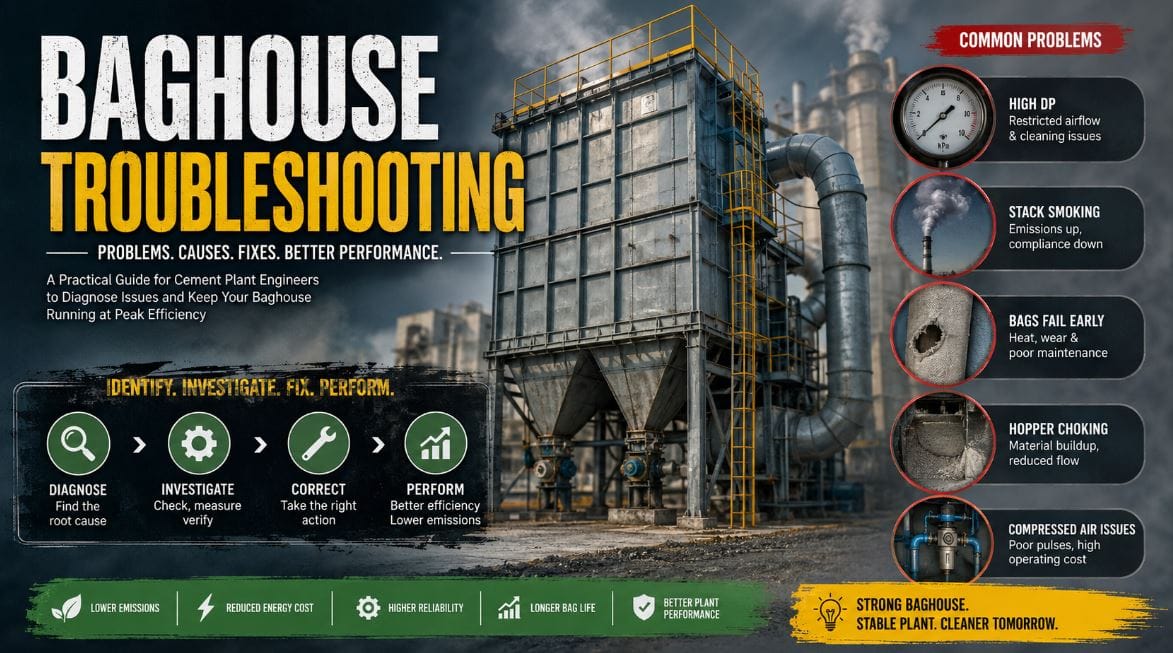
An engineer’s reference for identifying, investigating, and correcting baghouse performance issues
Table of Contents
Even a well-designed baghouse will experience performance issues over time. In cement plants, these issues are typically identified through rising Differential Pressure (DP), unstable mill ventilation, increasing stack emissions, higher fan power consumption and frequent filter bag failures. While the immediate response is often to increase pulse frequency or replace filter bags, the root cause is frequently found elsewhere in the system.
Problems such as false air ingress, hopper choking, pulse valve failures, worn rotary airlocks and inadequate compressed air quality can significantly impact baghouse performance and overall process stability. This guide examines the most common baghouse problems encountered in cement plants, along with their probable causes, inspection methods, and practical corrective actions to help plant engineers improve reliability, reduce emissions, and maintain stable operation.
High Differential Pressure (DP) in Cement Plant Baghouses
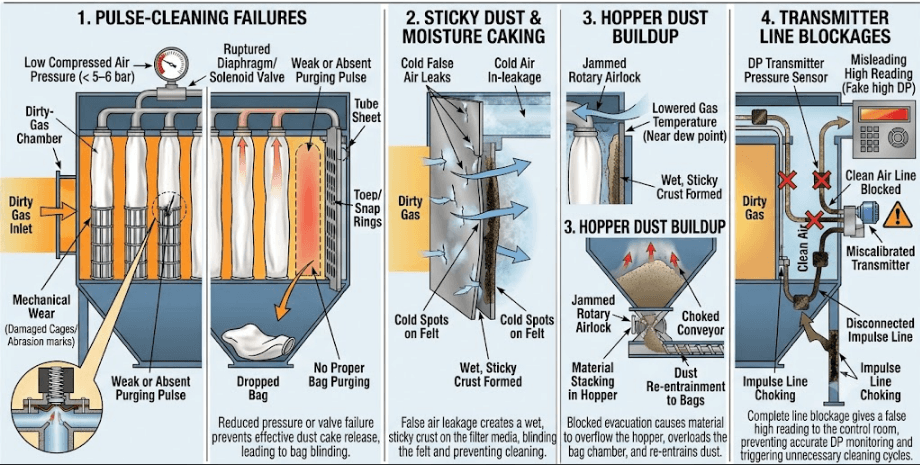
High Differential Pressure (DP) simply means your baghouse is struggling to breathe because something is restricting airflow across the filter bags. Before assuming the filter bags are permanently ruined, look for the actual root cause on the shop floor. In most cement plants, high DP comes down to a few common operational issues:
- Pulse-cleaning failures: Low compressed air pressure (below 5–6 bar) or ruptured diaphragm/solenoid valves that stop bags from getting a proper purging pulse.
- Sticky dust & moisture caking: Cold false air leaking into the casing, lowering gas temperatures near the dew point and creating a wet, sticky crust on the felt.
- Hopper dust buildup: A jammed rotary airlock or choked conveyor causing material to stack up in the hopper and re-entrain straight back onto the bags.
- Transmitter line blockages: Dust choking the impulse lines on the DP transmitter, giving the control room a false high reading.
Related Reading: This article is Part 3 of our Baghouse Optimization Series. If you haven’t already, we recommend reading Part 1, which explains the fundamentals of baghouse operation, filtration principles, and optimization techniques, followed by Part 2, which covers the major Pulse Jet Baghouse components and their functions in detail.
Part 1: Introduction, Importance, Working Principle & Process Flow
Part 2: Complete Guide to Pulse Jet Baghouse Components, Failure Mechanisms & Maintenance
The Fix: Step-by-Step Action Plan
Instead of just cranking up the pulse frequency from the control desk, tackle high DP with a simple process of elimination on the floor:
- Clear the transmitter lines: Flush the DP impulse tubing with clean instrument air first to make sure you are troubleshooting a real process spike, not a clogged sensor.
- Audit the cleaning system: Walk the top plenum, verify that header pressure is holding steady at 5–6 bar, and replace any stuck or dead pulse valves.
- Seal false air leaks: Check access doors, duct flanges, and expansion joints for cold air ingress, and seal them to stop localized condensation and bag blinding.
- Verify hopper evacuation: Ensure rotary airlocks, screw conveyors, and fluidizing pads are running continuously so material clears out smoothly.
By restoring cleaning energy, sealing out cold air, and keeping the hoppers empty, the differential pressure will settle back to normal without needing an expensive bag replacement.placement. can prevent unnecessary bag replacement, reduce energy consumption, and help maintain stable plant operation.
Why Low Baghouse DP is Dangerous
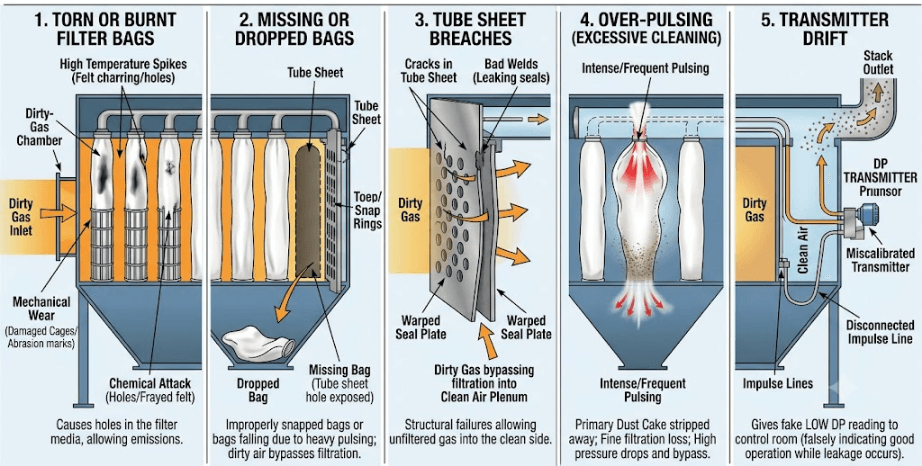
Operators often see low Differential Pressure (DP) and think the baghouse is running effortlessly. But in reality, an abnormally low DP usually means flue gas is taking a shortcut around your filters. Instead of clean air passing through fine fabric, raw dust-laden gas is escaping straight out the stack. On the plant floor, low DP generally traces back to a few critical failures:
- Torn or burnt filter bags: High temperature spikes, mechanical wear from damaged cages, or chemical attack creating holes in the felt.
- Missing or dropped bags: Bags that were improperly snapped into the tube sheet or fell off entirely during heavy pulsing.
- Tube sheet breaches: Cracks, bad welds, or warped seal plates allowing dirty gas to bypass the dirty-gas chamber straight into the clean-air plenum.
- Over-pulsing (Excessive Cleaning): Pulsing too hard or too frequently, which strips away the primary dust cake that actually does the fine filtration.
- Transmitter drift: A miscalibrated DP transmitter or a disconnected impulse line giving the control room a fake low reading.
The Fix: Step-by-Step Action Plan
If DP suddenly drops, especially if stack opacity starts creeping up, treat it as an active filtration bypass and follow this troubleshooting sequence:
- Check stack opacity & visual emissions: If DP drops and the stack gets dusty, stop assuming it’s good airflow, gas is bypassing the filter media.
- Audit the clean-air chamber (Walk the Plenum): Look for dust accumulation on top of the tube sheet. A layer of dust in the clean plenum points directly to a torn bag, loose cage, or tube sheet crack underneath.
- Perform a fluorescent dye test: Inject fluorescent powder into the inlet duct during a short stoppage and use a UV light in the clean chamber to instantly pinpoint precise bag tears or tube sheet leaks.
- Inspect pulse settings: Ensure off-line or on-line pulsing isn’t firing continuously at excessively high pressure, which destroys the protective dust layer on fresh bags.
- Calibrate the DP transmitter: Verify impulse tubing connections and zero-point calibration to ensure the DCS is showing true differential pressure.
By catching bag damage early, sealing tube sheet cracks, and maintaining a healthy protective dust cake, you protect your ID fans from abrasive wear and keep the plant in strict environmental compliance.
Why Your Stack is Smoking
Related Reading: If you would like to learn more about mill stability, read our article on Common Causes of Vibration in Vertical Roller Mills (VRM) and Their Troubleshooting, where the most common process- and mechanical-related vibration issues are explained with practical troubleshooting tips.
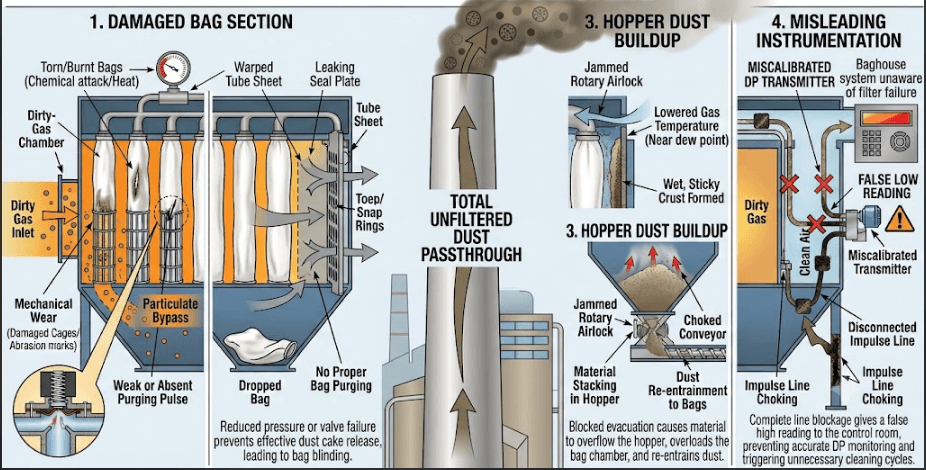
High stack emissions aren’t just an environmental headache, they mean your baghouse has lost its seal and raw dust is bypassing your filtration system. On a cement plant floor, dust escaping out the stack almost always comes down to a physical breach between the dirty-gas compartment and the clean-air plenum:
- Torn or abraded filter bags: High gas velocities, abrasive clinker/cement dust, or bent/burred cages rubbing through the felt.
- Poor bag seating: Bags snapped incorrectly into the tube sheet cell plates, leaving hidden gaps around the top seals.
- Tube sheet cracks: Corroded, cracked or poorly welded tube sheets letting dust bypass the bags entirely.
- Overfilled hoppers: Material backing up into the bag zone, blinding the bottoms of the bags and scouring holes right through the fabric.
- Chemical or thermal shock: Dew point drops (acid rain inside the casing) or high-temperature excursions burning out bag media.
The Fix: Step-by-Step Action Plan
When CEMS alerts start firing or you see a visible plume from the stack, use this step-by-step field approach to isolate and fix the leak:
- Isolate compartments (if multi-compartment): Turn off one compartment at a time while watching your online dust monitor. When emissions drop sharply, you’ve found the leaking chamber.
- Walk the clean plenum: Open the top doors and look for dust dusting the clean-air side. A patch of dust directly pinpoints which specific bag cell or tube sheet seam is leaking.
- Run a fluorescent dye test: If the leak isn’t obvious, inject fluorescent powder into the inlet duct with the fan running, then inspect the clean chamber with a UV light, leaking bags and cracks will glow instantly.
- Replace damaged bags & cages: Never put a new bag over a bent, corroded, or damaged cage. Ensure the top snap-band clicks tightly and evenly into the tube sheet hole.
- Inspect the hopper & airlock: Make sure the rotary airlock and discharge screw are clearing dust continuously so material never reaches bag level.
Keeping stack emissions near zero comes down to tight installation practices, good cage condition, and catching minor tube sheet leaks before they eat away at your environmental compliance.
Why Your Bags Are Dying Early
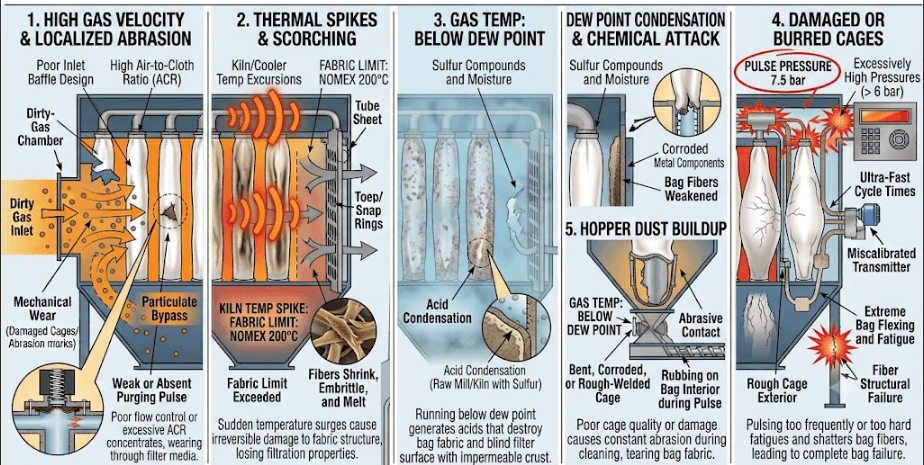
Filter bags are built to last 2 to 3 years, so if you’re swapping them out every 6 to 12 months, it’s rarely just a “bad batch of media.” Premature bag failure is almost always a direct result of process conditions or mechanical abuses happening inside the baghouse casing:
- High gas velocity & localized abrasion: Poor inlet baffle design or high Air-to-Cloth Ratios (ACR) blast abrasive clinker or raw dust straight onto the bags, wearing holes near the bottom or middle.
- Thermal spikes & scorching: Kiln or cooler temperature excursions exceeding the fabric’s limit (like pushing polyester past 130°C–150°C or Nomex past 200°C), causing the fibers to shrink, embrittle, or melt.
- Dew point condensation & chemical attack: Running below gas dew points creates acid condensation (especially in raw mill/kiln exhausts with high sulfur content), which weakens bag fibers and blinds the felt with hard crusts.
- Damaged or burred cages: Bent, corroded, or rough-welded cages constantly rubbing against the bag interior during pulsing cycles until the fabric tears.
- Over-aggressive pulsing: Pulsing at excessively high pressures (above 6 bar) or using ultra-fast cycle times that flex and fatigue the bag fibers to the point of structural failure.
The Fix: Step-by-Step Action Plan
Extending bag life requires looking at how the failed bags actually look when pulled, then systematically eliminating the mechanical or process trigger on the floor:
- Inspect the failure pattern: Map out where the bags are tearing. Tears near the bottom point to high inlet velocity or hopper re-entrainment; vertical slits point to rough cage wires; brittle, crumbly fabric points to heat or acid attack.
- Audit gas temperature & dew point: Set up tight alarm limits in the DCS to prevent high-temperature excursions. Keep operating temperatures safely above the acid dew point to prevent moisture condensation inside the casing.
- Straighten and deburr cages: Before installing new bags, check every cage. Throw out bent cages and smooth down any rough welds or burrs that could scrape the inner felt.
- Tune pulse cleaning parameters: Dial back pulse air pressure to OEM specs (typically 4.5–5.5 bar) and widen the pulse interval so you only clean when necessary, preserving the protective primary dust cake.
- Check gas distribution baffles: Inspect inlet diffuser plates or target baffles near the baghouse inlet to ensure gas is distributed evenly rather than sandblasting the first couple of rows.
By controlling temperature spikes, smoothing out cage surfaces, and protecting bags from abrasive gas velocities, you can easily pull bag life back into the normal 24 to 36-month range.
Compressed Air Bleeding Your Power Bill
Compressed air is one of the most expensive utilities on a cement plant site. When a baghouse consumes too much compressed air, it’s not just driving up power costs, it actively starves the cleaning header, leading to weak pulses, uncleaned bags, and rising differential pressure (DP). On the plant floor, excessive compressed air demand usually boils down to a few widespread maintenance issues:
- Stuck open or ruptured diaphragm valves: A cracked diaphragm or stuck solenoid valve causes compressed air to blow out continuously into the plenum instead of delivering a sharp, momentary blast.
- Over-aggressive pulse duration: Setting pulse time too long (e.g., above 100–150 milliseconds). The effective shockwave happens in the first fraction of a second; any extra time just dumps volume down the venturi.
- Header & piping leaks: Corroded fittings, dry-rotted flex hoses, or leaky seal joints on the air receiver and purge headers constantly bleeding pressure.
- Over-frequent pulse cycles: Pulsing continuously on a rigid timer rather than using DP-based demand cleaning, firing off valves even when bags don’t need cleaning.
- Wet or dirty air ruining valves: Poor instrument air drying leading to water or oil in the headers, which ruins seals, corrodes valve bodies, and causes solenoids to stick.
The Fix: Step-by-Step Action Plan
To cut air consumption, regain full header pressure, and lower compressor load, follow this practical site auditing routine:
- Perform a top- plenum walk (Listen for continuous blowing): Walk the top of the baghouse while the unit is running. If you hear a loud, continuous hissing or roaring sound, you have a ruptured diaphragm or a stuck solenoid valve bleeding the air receiver dry.
- Optimize pulse duration on the controller: Check your timer settings in the PLC/DCS. Ensure the pulse width (on-time) is set short – typically between 80 to 120 ms. Anything longer wastes compressed air without adding any cleaning energy.
- Switch to Differential Pressure (DP) demand cleaning: Instead of running pulse cleaning on a continuous timer, set the system to clean only when DP reaches a set setpoint (e.g., start at 130 mmWC, stop at 100 mmWC).
- Run an ultrasonic leak survey: Walk the compressed air distribution lines, header tanks, and drop legs with an acoustic leak detector to identify and repair minor air leaks around flanges and fittings.
- Inspect instrument air quality: Check receiver drain traps and air dryers. Ensure clean, dry air (dew point below -20°C) reaches the manifold so valve seals don’t fail prematurely.
Fixing leaking valves and trimming unnecessary pulse cycles often cuts baghouse air demand by 15% to 25%, giving you steady header pressure for better bag cleaning while dropping compressor energy costs.on.
In a Vertical Roller Mill (VRM), harder clinker often requires increased fan airflow to transport the additional internal recirculation and maintain efficient material separation. Understanding and accurately measuring actual fan flow is therefore essential for stable mill operation and energy optimization. For a detailed explanation, read Fan Flow Measurement in Cement Plants: Methods, Calculations & Optimization.
Why Hoppers Choke and Dust Backs Up
Hopper choking isn’t just a material handling annoyance, when dust stacks up inside a hopper, it climbs straight into the bag area. This buries the bottom of the filter bags, sandblasts the media, blocks incoming gas flow, and causes baghouse DP to spike. On a cement plant floor, dust bridging and hopper backup usually come down to a few practical site issues:
- Rotary airlock wear or jamming: Worn rotor tips or mechanical jams letting dust accumulate while pulling cold false air directly up into the hopper bottom.
- Cold spots & condensation: Unheated or poorly insulated hoppers causing flue gas temperatures to drop below the dew point, turning fine raw meal or cement dust into a sticky, rock-hard bridge.
- Shallow hopper angles: Inadequate hopper wall slopes (below 60 degrees) or failing fluidizing pads/vibro-motors that allow fine dust to cling to the corners and build up.
- Compaction during shutdowns: Leaving hoppers full of hot dust during an unplanned stop, allowing the material to settle, cool, and compact into a solid block.
- Downstream conveyor trips: Screw conveyors, drag chains, or air slides tripping out while the baghouse keeps pulsing, feeding material into a dead-end discharge.
The Fix: Step-by-Step Action Plan
To clear choked hoppers, stop dust re-entrainment, and protect your filter bags from severe bottom wear, follow this systematic field approach:
- Inspect & gap the rotary airlock: Check the clearances between the airlock rotor blades and housing. Replace worn wiper tips to maintain a tight air seal and ensure continuous, positive material discharge.
- Audit hopper insulation & heating elements: Verify that hopper trace heating elements and insulation jackets are working properly, especially on Kiln and Raw Mill circuits, to keep wall temperatures safely above the gas dew point.
- Check discharge aids & level switches: Test high-level capacitance probes or nuclear level switches to catch backups early. Ensure vibro-motors, aeration pads, or air cannons are firing on correct timing cycles during operation.
- Flush hoppers before every stoppage: Never leave dust sitting in hoppers during a shutdown. Always run discharge equipment for 15–20 minutes after shutting down process feed to completely empty the hoppers.
- Clear bridging safely: If a hopper bridges, clear the blockage through rodding ports or inspection hatches using low-pressure air lances. Avoid hitting hopper walls with sledgehammers, as this dents the metal and creates internal lip points for worse future bridging.
By keeping rotary airlocks sealed, maintaining hopper skin temperatures, and ensuring complete discharge during stops, you eliminate material backup and protect the bottom section of your filter bags from severe abrasive wear.
How Cold False Air Silently Kills Bags
False air ingress is one of the most destructive yet frequently ignored problems in a cement plant baghouse. Every volume of cold ambient air sucked into a negative-pressure system shrinks your thermal margin, pulls flue gas below its acid dew point, and creates localized condensation. This turns fine raw meal, cement, or coal dust into a rock-hard mud that permanently blinds filter bags and corrodes internal casing walls. On the floor, air leakage generally enters through a few notorious weak points:
- Worn or missing access door gaskets: Dried-up, torn, or heat-damaged rubber/rope seals around plenum hatches and inspection doors.
- Torn or dry-rotted expansion joints: Cracked fabric or rubber bellows at the baghouse inlet/outlet ducts flexing and pulling in ambient air.
- Worn rotary airlocks at hopper bottoms: Excessive blade clearance acting like a vacuum, sucking air up through the hopper and re-entraining dust directly onto the bags.
- Corroded casing seams & duct flanges: Pinhole rust spots, cracked welds, or unsealed instrument ports along negative-pressure ducting.
The Fix: Step-by-Step Action Plan
Before swapping out a blinded set of filter bags, isolate and eliminate cold air leaks using this field inspection sequence:
- Perform a thermal imaging or smoke survey: Use an infrared camera during normal operation to spot “cold streaks” along casing walls, doors, and expansion joints. Alternatively, use a smoke pencil around seal boundaries to watch where ambient air is being drawn in.
- Replace door gaskets with high-temp seals: Strip out degraded door seals and replace them with properly rated silicone or tadpole braid gaskets to ensure an airtight seal when latched.
- Repair or patch expansion joint bellows: Replace damaged expansion joint covers or apply silicone glass-cloth patches over minor outer fabric tears until the next planned maintenance outage.
- Re-blade rotary airlocks: Adjust or replace worn airlock rotor tips to re-establish a tight mechanical seal at the hopper discharge.
- Seal ducting & instrument ports: Weld up casing cracks and cap off any open test points or unused DP impulse line connections.
Eliminating false air keeps operating temperatures comfortably above the gas dew point, prevents sticky dust caking, and ensures your filter media achieves its full designed lifespan.
Recommended Reading: Since clinker quality is closely linked to kiln operation, understanding burning conditions, heat balance, and thermal efficiency is essential for improving cement mill performance. For a detailed explanation of these topics, check out this comprehensive guide on Amazon Kindle.
When Pulse Valves Stop Purging
Pulse valves are the mechanical heart of your baghouse’s cleaning system. When a pulse valve fails, the filter bags in that specific row stop getting cleaned, dust rapidly builds up into a dense crust, and differential pressure (DP) starts climbing. On a cement plant floor, pulse valve failures almost always show up in two ways: a valve that won’t fire at all, or a valve that gets stuck wide open and bleeds your main air receiver dry.
The primary culprits behind these failures include:
- Ruptured or fatigued diaphragms: Rubber diaphragms flexing millions of times eventually crack, split, or lose their elasticity, preventing the valve from building pressure or snapping shut.
- Wet, oily or dirty compressed air: Water, rust scale or compressor oil traveling down the air header damages the internal rubber seals and gums up the small relief ports inside the valve body.
- Failing solenoid coils: Burned-out, shorted, or water-damaged solenoid coils that fail to open the pilot circuit when receiving a signal from the PLC/DCS.
- Corroded or broken internal springs: Weakened return springs that can no longer push the diaphragm back into its seating position, causing the valve to blow air continuously.
The Fix: Step-by-Step Action Plan
When you hear a continuous roar from the top deck or notice a specific compartment’s DP climbing, follow this simple field sequence to identify and fix the faulty valve:
- Listen for continuous blow-through: Walk the top air plenum while the system is under pressure. A loud, continuous hissing or roaring sound means a diaphragm has ruptured or a solenoid is stuck open, draining pressure from the entire header.
- Check header pressure drop: Watch the pressure gauge on the air manifold during a pulse cycle. If the pressure drops severely and takes a long time to recover, a valve in that row is bleeding air instead of delivering a sharp, instantaneous shot.
- Inspect and clean the pilot solenoid: Disconnect power, unbolt the solenoid operator, and check for moisture, rust, or debris in the plunger assembly. Clean out the tiny relief bleed hole with a fine wire.
- Replace damaged diaphragms & springs: Isolate the header, bleed off compressed air, and open the pulse valve cover. Swap out torn diaphragms, check for debris on the valve seat, and replace any rusted return springs.
- Drain water & oil from air headers: Install automatic drain traps at the air receiver and header drop legs to ensure only dry, oil-free instrument air reaches the rubber diaphragms.
By keeping your compressed air clean and dry and replacing worn diaphragms promptly, you ensure sharp, powerful cleaning pulses that keep your bags clean and your DP rock-steady.
When Solenoid Valves Miss Their Signal
Solenoid valves act as the electrical trigger for your entire pulse-cleaning system. They receive an electrical signal from the PLC or local timer board and open a small pilot port, which then releases air to actuate the main diaphragm valve. If a solenoid valve fails, the diaphragm valve never fires, the corresponding row of filter bags never gets cleaned, and dust quickly builds up, causing localized bag blinding and rising differential pressure (DP).
On a cement plant floor, solenoid valve problems usually stem from a few common electrical and mechanical issues:
- Burnt or shorted coils: Continuous cycling, heat exposure, or voltage spikes damaging the internal copper windings of the solenoid coil.
- Corroded or loose electrical connections: Vibration, dust buildup, or moisture ingress inside the terminal box causing loose wiring, short circuits, or poor grounding.
- Clogged pilot ports: Fine dust, rust scale, or moisture in the pilot line blocking the small orifice, preventing the plunger from shifting even when the coil energizes.
- Stuck or corroded internal plungers: Moisture or oil contamination causing the internal stainless steel plunger or spring to bind up, keeping the pilot port permanently closed (or stuck open).
- PLC/DCS output card failures: Faulty output relays or loose wiring on the main control panel failing to send the 24V DC or 110V AC firing signal to the field junction box.
The Fix: Step-by-Step Action Plan
When a specific compartment’s DP starts creeping up or a row of bags stops pulsing, use this practical electrical and mechanical troubleshooting sequence:
- Verify the PLC signal: Check the status LED on the PLC output card or local timer board to ensure the firing signal is actively triggering for that specific pulse channel.
- Check supply voltage & coil resistance: Measure the voltage at the solenoid terminals during a pulse sequence to confirm power reaches the field. Disconnect the coil and measure resistance with a multimeter – a zero reading (short) or infinite reading (open circuit) means the coil is burnt and needs replacement.
- Perform a manual override test: Most field solenoids have a manual override button or pin. Press it manually – if the diaphragm valve fires when pressed manually but not electrically, the issue is electrical (coil, wiring, or PLC signal). If it still doesn’t fire, the problem is mechanical (clogged pilot port or damaged diaphragm).
- Clean the pilot port & plunger assembly: Isolate the air supply, disassemble the solenoid enclosure, and inspect the internal plunger and spring. Clean out any dirt, scale, or moisture, and clear the tiny pilot bleed hole using a fine wire or aerosol contact cleaner.
- Seal solenoid enclosures against weather & dust: Ensure junction box covers, conduit glands, and solenoid housing gaskets are tightly sealed to prevent rain, washdown water, and fine cement dust from shorting out the electrical coils.
Keeping solenoid coils dry, connections tight, and pilot ports clear ensures your cleaning sequence fires reliably row by row, maintaining stable DP across the entire baghouse.
Recommended Reading: Since baghouse performance is closely influenced by raw mill gas flow, temperature, moisture, and process stability, understanding Raw Mill operation and optimization can help improve overall baghouse efficiency. For a detailed guide on raw mill operation, troubleshooting, and process optimization, check out this comprehensive book on Amazon Kindle.
The Overlooked Seal and Discharge Failures
Rotary airlocks are the unsung workhorses of a cement plant baghouse. They have two equally critical jobs: dropping collected dust into your discharge conveyors, and keeping cold ambient air from getting sucked back up into the negative-pressure hopper. When an airlock fails, dust stacks up straight into the bag zone, or cold false air gets pulled in – causing temperature drops, localized condensation, sticky dust caking, and climbing differential pressure (DP).
On a cement plant floor, rotary airlock troubles almost always trace back to these core issues:
- Excessive rotor-to-housing clearance: Abrasive raw meal, clinker, or coal dust wearing down rotor tips, creating a massive gap that acts like a vacuum pipe sucking cold air straight into the hopper.
- Mechanical jams & foreign objects: Nuts, bolts, welding rods, or hard dust clinkers getting wedged between the rotor vanes and the casing, tripping the drive motor or shearing the drive pin/keyway.
- Worn seals & packing glands: Failed shaft seals letting fine dust migrate into the outboard bearings, destroying the bearings and causing shaft misalignment or severe grinding noises.
- Drive system failures: Broken drive chains, loose sprockets, burnt drive motors, or oil-starved gearboxes failing to turn the rotor under full load.
- Material thermal expansion: Hot dust (especially in Kiln/Preheater or Cooler baghouses) expanding the rotor faster than the housing, causing the unit to bind up tight during process temperature spikes.
The Fix: Step-by-Step Action Plan
When you hear grinding noises from the hopper discharge floor, see motor trip alarms in the DCS, or notice cold air being pulled up into the casing, follow this field inspection sequence:
- Measure rotor tip clearances: Shut down and lock out the feeder. Use feeler gauges to measure the gap between the rotor tips and housing wall. If clearance exceeds 0.15 to 0.20 mm (or OEM spec), adjust or replace the adjustable tip wipers to re-establish a tight seal.
- Check drive alignment & shear protection: Inspect drive chain tension, sprocket alignment, and shear pins/couplings. Ensure overload trip currents are correctly set in the MCC so the motor trips before destroying internal shafts or gears during a physical jam.
- Flush bearings & maintain packing glands: Inspect outboard bearing blocks. Ensure shaft seals are packed and greased regularly to keep fine dust from grinding into the rollers. Replace worn bearings immediately if you hear metal-on-metal grinding.
- Clear physical jams safely: If a hard chunk jams the rotor, lock out power, open the inspection hatch, and clear the obstruction. Never attempt to force a jammed rotor using the drive motor, as this bends internal vanes and cracks the housing.
- Pre-heat cold airlocks before startup: In high-temperature applications, ensure process gas pre-heats the airlock casing evenly before feeding heavy dust loads, preventing thermal binding between the rotor and housing.
Keeping rotor clearances tight, drive chains adjusted, and bearings well-greased stops false air dead in its tracks and keeps hoppers clearing continuously so material never climbs back up to bury your filter bags.
The Fast Track to Ruined Filter Bags
Operating a baghouse below its gas dew point is single-handedly one of the fastest ways to destroy filter bags, corrode casing walls, and bring process ventilation to a halt. When flue gas temperatures drop below the water or acid dew point, moisture condenses directly onto the filter media. Fine raw meal, cement, or coal dust absorbs this moisture and turns into a thick, rock-hard mud. Once this mud bakes into the fabric weave, no amount of pulse cleaning can dislodge it, causing differential pressure (DP) to skyrocket and forcing premature bag replacement.
On a cement plant floor, dew point condensation and bag blinding usually stem from a few common operational triggers:
- Cold false air ingress: Ambient air leaking through unsealed access doors, expansion joints, or worn rotary airlocks, dropping gas temperatures locally below the acid/water dew point.
- Damaged or missing casing insulation: Uninsulated baghouse walls or ductwork allowing heat to radiate away rapidly, especially during cold weather, rainy seasons, or night shifts.
- Low process operating temperatures: Running kiln, raw mill, or coal mill circuits at reduced feed rates or low outlet temperatures without adjusting auxiliary heating or bypass dampers.
- Frequent cold startups and shutdowns: Starting up or idling the plant without properly pre-heating the baghouse casing, letting moisture condense on cold bags during the initial gas warm-up.
- High moisture content in raw materials: Processing wet raw materials, alternative fuels, or high-moisture slurry feed without increasing gas outlet temperatures to compensate.
The Fix: Step-by-Step Action Plan
To stop moisture condensation, prevent mud-caking on filter media, and protect internal casing walls from acid corrosion, follow this field troubleshooting sequence:
- Maintain a strict thermal safety margin: Monitor inlet and outlet gas temperatures continuously in the DCS. Keep baghouse gas temperatures comfortably 15°C to 20°C above the calculated acid/water dew point across all operating modes.
- Execute pre-heating routines before gas introduction: Always run auxiliary hot air generators or bypass warm air through the baghouse to heat internal casing metal above $100^\circ\text{C}$ before feeding raw materials or fuel into the system during startups.
- Audit and repair casing insulation: Inspect external insulation cladding on ductwork, hopper walls, and upper plenums. Replace wet, loose, or missing insulation blankets to prevent localized cold spots where moisture condenses.
- Seal every point of false air ingress: Conduct routine smoke tests or thermal imaging surveys around inspection hatches, expansion joints, and duct flanges to stop cold ambient air from lowering internal gas temperatures.
- Purge bags with dry air before long shutdowns: When stopping the circuit, keep the pulse-cleaning system running for 10–15 minutes with the ID fan idling to clear lingering moisture and dry dust out of the bag weave before the unit cools down.
Keeping internal temperatures safely above the dew point, maintaining tight casing insulation, and sealing out cold false air keeps dust dry, ensures efficient pulse cleaning, and preserves bag life for years instead of months.
When a Choked Baghouse Stangles Your Production
Baghouses don’t exist in a vacuum, they are the lungs of your cement manufacturing process. When a baghouse gets choked with dust or suffers from severe airflow resistance, your ID Fan can no longer pull the required volume of gas through the circuit. To prevent mill pressurization, raw meal backspills, or kiln inlet puffing, control room operators are forced to do the one thing no plant manager wants to see: cut the feed rate.
On a cement plant floor, reduced ventilation at the Kiln, Raw Mill, Cement Mill or Coal Mill usually points to these primary process chokepoints:
- Persistently high baghouse DP: Heavy bag blinding, thick mud-caking, or broken pulse systems acting like a wall in the ductwork, starving the fan of gas flow.
- Heavy false air load upstream of the fan: Cold ambient air leaking into ducting, expansion joints, or pre-heater casings, filling up ID fan capacity with useless outside air instead of pulling process gas from the mill or kiln.
- Material buildup in ductwork & drop legs: Dust settling out in horizontal duct runs, elbow turns, or inlet dampers due to low transport velocities, physically narrowing the gas path.
- ID fan blade wear & buildup: Abrasive dust wearing down fan impellers or coating fan blades unevenly, destroying fan efficiency and causing heavy vibration trips at high RPMs.
- Fully loaded or tripping ID fan dampers: Inlet vane control dampers, poppet valves, or variable frequency drives (VFDs) stuck in partially closed positions or maxed out on amps.
The Fix: Step-by-Step Action Plan
When a mill or kiln circuit is starved for draft and the ID fan is maxed out, follow this practical system-wide diagnostic sequence:
- Audit system static pressures (Draft Profile): Take pitot tube readings or check DCS pressure transmitters sequentially from the mill/kiln outlet, baghouse inlet, baghouse outlet, to the ID fan inlet. The section with the biggest pressure drop (ΔP) pinpoints your exact restriction point.
- Fix the baghouse DP first: If the baghouse drop accounts for most of the system resistance, tackle the root cause, clear clogged pulse valves, adjust pulse timing, or seal false air leaks to drop DP back to healthy levels (100 – 120mmWC).
- Conduct an upstream false air audit: Measure O2 levels or gas temperatures before and after the baghouse. A noticeable jump in oxygen percentage or a sudden temperature drop means you are pulling ambient air instead of process draft, wasting expensive fan capacity.
- Inspect ducts for physical material accumulation: Open inspection doors along horizontal gas ducts and entry drop legs during a stoppage to check for heavy dust settling or drop-out beds restricting the cross-sectional area.
- Inspect fan condition & damper linkages: Verify that ID fan inlet vanes or butterfly dampers are physically moving to 100% open when the DCS calls for max output, and clean any uneven dust cakes off the fan impeller blades.
By restoring airflow through the baghouse, sealing upstream air leaks, and keeping gas ducts clear, you free up fan margin, stabilize system draft, and allow the control room to push feed rates back to peak capacity.
Conclusion: Baghouses Don’t Fail Overnight
In a cement plant, baghouses rarely break down completely out of nowhere. What looks like a sudden operational crisis is almost always the final straw after weeks of small, interconnected issues piling up on the floor. A weeping diaphragm valve starves header pressure; a minor leak at an expansion joint pulls in cold ambient air; a worn rotary airlock lets material bridge in a hopper. Individually, these seem like small field items you can defer until the next shutdown. But together, they trigger a chain reaction-dropping temperatures below the dew point, blinding filter bags, driving up Differential Pressure (DP), and ultimately forcing the control room to cut mill feed or pull down kiln output.
Practical baghouse maintenance isn’t about repeatedly treating symptoms like cranking up pulse frequencies or ordering premature bag replacements. It comes down to a systematic, site-tested mindset:
[Systematic Troubleshooting Mindset]
       │
       ├──► Fix the cleaning energy (Clean compressed air + sharp valve firing)
       ├──► Protect the thermal window (Seal false air + stay above the dew point)
       ├──► Keep the hoppers clear (Continuous discharge + tight rotary seals)
       └──► Respect the process draft (Keep DP low to protect ID fan capacity)
At the end of the day, a baghouse shouldn’t be viewed as just an annoying, high-maintenance environmental compliance box at the end of the ductwork. It is a core process machine. Treat it with the same engineering rigor, routine floor checks, and root-cause troubleshooting you give your mills, kilns, and main drives, and it will reward you with stable draft, longer bag life, lower power bills, and maximum plant throughput.
Baghouse Troubleshooting Quick-Reference Guide
| Operational Problem | Primary Cause | First Thing to Check | Immediate Field Action |
|---|---|---|---|
| High Differential Pressure (DP) | Bag blinding, poor cleaning, false air | Pulse valves & compressed air pressure | Check pulse operation, header pressure, hopper discharge and inspect for false air ingress. |
| Low Differential Pressure (DP) | Torn bags or gas bypassing filter media | Stack condition and clean air plenum | Check for visible emissions, inspect bags, tube sheet, and verify DP transmitter health. |
| High Stack Emissions | Bag failure or sealing issues | Stack opacity and compartment condition | Isolate compartments if possible and inspect bags, snap bands, and tube sheet sealing. |
| Hopper Choking | Dust accumulation or discharge failure | Rotary airlock and hopper condition | Verify rotary airlock operation, inspect hopper level, and ensure continuous dust discharge. |
| False Air Ingress | Leakage through casing or ducting | Expansion joints and access doors | Inspect expansion joints, access doors, duct flanges, and repair any leakage points. |
| Excessive Compressed Air Consumption | Continuous pulsing or diaphragm failure | Pulse valves and pulse settings | Check for leaking diaphragm valves and review pulse frequency and pulse duration settings. |
| Low Mill/Kiln Ventilation | High baghouse resistance or fan limitations | Baghouse DP and ID fan loading | Check baghouse DP, ID fan amps, and inspect the gas path for restrictions or air leakage. |
Frequently Asked Questions (FAQ)
Q1: What is the normal differential pressure (DP) of a cement plant baghouse?
The normal DP depends on the baghouse type, filter media, gas volume, and OEM design. In many pulse-jet baghouses used in cement plants, DP is commonly maintained between 100 and 180 mmWC. More important than the actual value is stability. A gradual increase in DP over several days usually indicates bag blinding, cleaning problems, hopper choking, or false air ingress.
Q2: How long do filter bags normally last in a cement plant?
There is no fixed bag life. Depending on process conditions and maintenance practices, filter bags may last anywhere from 2 to 4 years or even longer. In clinker cooler and kiln applications, bag life is often affected by high temperature, abrasion, and process upsets. If bags start failing within a few months, the root cause is usually related to operating conditions rather than bag quality alone.
Q3: What is the first thing to check when stack emissions suddenly increase?
The first step is to determine whether the increase is caused by bag damage or a process upset. Check stack condition, compartment DP trends, and clean-air plenum dust accumulation. Torn bags, loose snap bands, damaged cages, and tube sheet leakage are among the most common causes of sudden emission increases.
Q4: Why is false air harmful to baghouse performance?
False air increases the volume of gas handled by the baghouse and ID fan, which increases power consumption and reduces system efficiency. In kiln and raw mill applications, false air can also reduce gas temperature below the dew point, causing condensation and dust caking on filter bags. Over time, this leads to higher DP, poor cleaning performance, and reduced bag life.
Q5: How can baghouse operating costs be reduced?
The biggest opportunities usually come from maintaining low and stable DP, reducing compressed air consumption, and eliminating false air ingress. Regular inspection of pulse valves, hoppers, expansion joints, and filter bags helps prevent problems before they affect production. In many cases, correcting air leaks and optimizing pulse cleaning can reduce both fan power and compressed air consumption without any major investment.
Q6: Does increasing pulse frequency always reduce high DP?
Not necessarily. If filter bags are blinded, hoppers are choked, compressed air pressure is low, or false air is causing dust caking, increasing pulse frequency may provide only temporary relief. The root cause should always be identified before making major changes to cleaning settings.
Q7: When should filter bags be replaced?
Filter bags should be replaced when they can no longer maintain acceptable emissions or when cleaning is no longer effective due to severe blinding or physical damage. Replacing bags without addressing the underlying cause often results in the same problem recurring within a short period.